Sage Fisherman Rib Tank Dress Free Knit Pattern
Sage Fisherman Rib Tank Dress Free Knit Pattern
Introduction
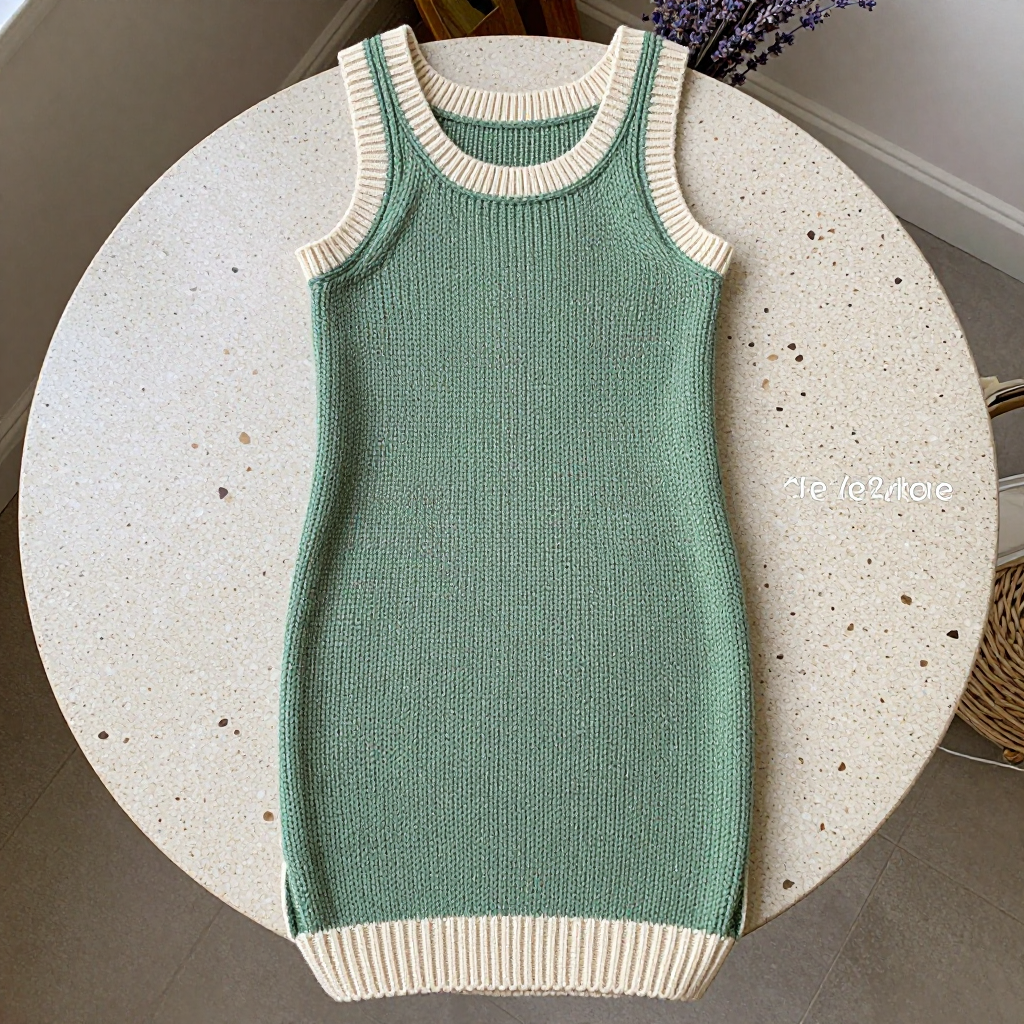
This sage fisherman rib tank dress is a relaxed, straight-tube knit that layers beautifully over a tee, a slip, or nothing at all on warm days. It's written for intermediate knitters who are comfortable working in the round and reading a simple two-row texture repeat, and it comes in four sizes to fit busts from 81 to 117 cm. The fisherman rib gives the fabric a deep, springy vertical texture that feels soft and slightly rustic in a linen-cotton blend, while the cream ribbed bands at the hem, neckline, and armholes add a crisp farmhouse contrast. Small side slits at the lower hem keep the dress easy to walk in and give it an effortless, lived-in look.
Materials Needed
- Yarn: Worsted weight linen blend (e.g., 50% linen, 50% cotton). Sage green (MC): approx. 800 (900, 1000, 1100) yds. Cream (CC): approx. 100 (110, 120, 130) yds.
- Needles: 4.5 mm (US 7) circular needle, 80 cm long; set of 4 double-pointed needles in 4.5 mm (US 7) for small circumferences; cable needle.
- Notions: Stitch markers, stitch holders or scrap yarn, tapestry needle, tape measure.
- Finished size: To fit bust 81-86 (91-97, 102-107, 112-117) cm / 32-34 (36-38, 40-42, 44-46) in. Finished bust circumference 86 (96, 106, 116) cm / 34 (38, 42, 46) in. Length from shoulder 85 (87, 89, 91) cm / 33.5 (34.5, 35, 36) in.
Abbreviations
- st(s): stitch(es)
- k: knit
- p: purl
- k1b: knit 1 below — insert the needle into the stitch one row below the next stitch on the left needle and knit it, letting the stitch above drop off
- rnd(s): round(s)
- RS / WS: right side / wrong side
- beg: beginning
- rep: repeat
- MC / CC: main color (sage) / contrast color (cream)
Gauge
16 sts and 24 rows = 4 inches (10 cm) in fisherman rib, blocked. Knit a swatch in pattern, block it, and measure a 10 cm section in the middle of the fabric; adjust needle size if needed to match.
Tips Before You Start
- Fisherman rib pulls in and grows in length once blocked, so always measure your gauge swatch after blocking before casting on.
- Keep a marker at the beginning of each round and count your stitches after every few rounds — dropped k1b stitches are easy to miss and hard to fix later.
- When you divide for front and back, write down which side is the RS so your pattern rows stay consistent while working flat.
- Linen blend yarn softens with washing; block gently and avoid hanging the finished dress, which can stretch the tube.
Step-by-Step Instructions
Notes: The dress is worked in the round from hem to underarm, then front and back are worked flat separately. Fisherman rib pattern (multiple of 2 sts): Row 1 (RS): p1, *k1, p1; rep from * to end. Row 2 (WS): k1, *p1, k1; rep from * to end. Row 3: p1, *k1b, p1; rep from * to end. Rep Rows 2-3 for pattern. When working in rounds, use stitch markers to mark the beginning of round.
Hem Band (CC)
With CC, cast on 172 (192, 212, 232) sts. Join to work in the round, being careful not to twist. Place marker for beg of rnd.
Rnds 1-6: *k1, p1; rep from * to end (172 (192, 212, 232) sts).
Change to MC.
Body
Rnd 1: p1, *k1, p1; rep from * to end (172 (192, 212, 232) sts).
Rnd 2: k1, *p1, k1; rep from * to end (172 (192, 212, 232) sts).
Rnd 3: p1, *k1b, p1; rep from * to end (172 (192, 212, 232) sts).
Rnds 4-360: rep Rnds 2-3 until piece measures 60 (61, 62, 63) cm from cast-on edge, ending after a WS rnd (172 (192, 212, 232) sts).
Side Slits
Next rnd: bind off 2 sts, work in pattern to last 2 sts, bind off 2 sts. Do not join. Turn (168 (188, 208, 228) sts).
Work back and forth in rows on the remaining 168 (188, 208, 228) sts for 4 cm, keeping pattern as established. The slits form at the sides.
Divide for Front and Back
Next row (RS): work in pattern across first 84 (94, 104, 114) sts for front, place these sts on holder. Work in pattern across remaining 84 (94, 104, 114) sts for back. Work back and forth on back sts only.
Back
Work even in pattern until armhole measures 18 (19, 20, 21) cm, ending after a WS row (84 (94, 104, 114) sts).
Next row (RS): work 28 (32, 36, 40) sts in pattern, bind off center 28 (30, 32, 34) sts, work in pattern to end (28 (32, 36, 40) sts each side).
Next row: work in pattern to end.
Next row: bind off 4 sts at beg of row, work in pattern to end (24 (28, 32, 36) sts).
Rows 5-10: rep last 2 rows 3 more times (12 (16, 20, 24) sts).
Place remaining 12 (16, 20, 24) sts on holder for shoulder strap. Break yarn.
Front
With RS facing, join MC to front sts. Work even in pattern until armhole measures 12 (13, 14, 15) cm, ending after a WS row (84 (94, 104, 114) sts).
Next row (RS): work 28 (32, 36, 40) sts in pattern, bind off center 28 (30, 32, 34) sts, work in pattern to end (28 (32, 36, 40) sts each side).
Next row: work in pattern to end.
Next row: bind off 4 sts at beg of row, work in pattern to end (24 (28, 32, 36) sts).
Rows 5-10: rep last 2 rows 3 more times (12 (16, 20, 24) sts).
Place remaining 12 (16, 20, 24) sts on holder for shoulder strap. Break yarn.
Shoulder Straps
Join front and back shoulder sts using three-needle bind-off. With RS facing, place front and back sts on two needles, hold needles parallel, and bind off together using MC (12 (16, 20, 24) sts joined per shoulder).
Neckline Band (CC)
With RS facing and using CC, pick up and knit 80 (84, 88, 92) sts evenly around neckline. Join to work in the round.
Rnds 1-4: *k1, p1; rep from * to end (80 (84, 88, 92) sts).
Bind off in pattern.
Armhole Edging (CC)
With RS facing and using CC, pick up and knit 60 (64, 68, 72) sts evenly around each armhole. Join to work in the round.
Rnds 1-3: *k1, p1; rep from * to end (60 (64, 68, 72) sts).
Bind off in pattern. Rep for the second armhole.
Assembly and Finishing
Weave in all ends on the wrong side, working them into the ribbed bands where possible so they don't show through the open fisherman rib. Gently smooth the side slits and shoulder straps into shape. Block the dress to the finished measurements, laying it flat and pinning the hem and neckline evenly; do not hang it while damp. Let it dry completely before wearing.
Pro Tips and Variations
- For a longer tunic version, add 10-15 cm to the body before the side slits and adjust yarn quantity accordingly.
- Swap the cream contrast for a soft oatmeal or charcoal to change the farmhouse feel while keeping the same construction.
- If you prefer a higher neckline, begin the front neck shaping 2-3 cm later than written, keeping the same bind-off sequence.