Twisted Ladder Tie-Front Crop: Free Knit Pattern
Introduction
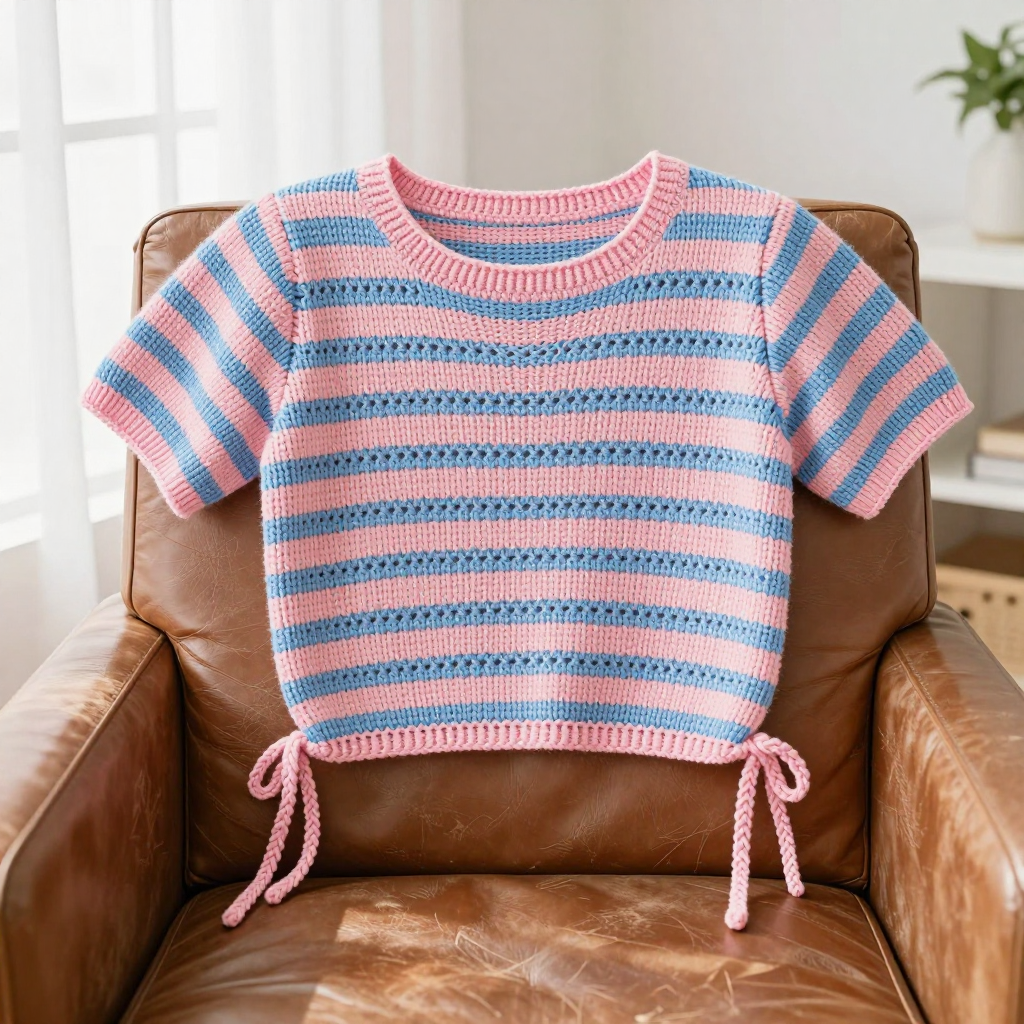
This Twisted Ladder Tie-Front Crop is the perfect first garment for a newer knitter who wants something that actually looks designed. It's built from one simple flat rectangle, so there's no shaping, no increasing, and no complicated construction to worry about. The magic comes from narrow pink and baby blue stripes, each one carrying a row of small open ladders made with easy eyelets. The finished top is light, soft, and slightly breezy, with a relaxed 18-inch width and a 16-inch length that sits right at the waist. Two little pink i-cord ties at the front hem give it a sweet, adjustable finish that makes it feel handmade in the best way.
Materials Needed
- Yarn: Fingering weight wool (100% wool), approximately 400 yards total: 200 yards cotton candy pink (Color A) and 200 yards baby blue (Color B).
- Needles: 3.75 mm (US 5) straight knitting needles, or size needed to match gauge.
- Notions: Tapestry needle for seaming and weaving in ends, a few stitch markers (optional), a measuring tape, and a spare double-pointed needle or small crochet hook for the i-cord ties.
- Finished size: To fit a 32–34 inch bust. Width 18 inches, length 16 inches (excluding ties).
Abbreviations
- CO: Cast on — make the starting loops on your needle.
- BO: Bind off — finish the edge so the stitches don't unravel.
- st(s): Stitch(es).
- k: Knit — the basic knit stitch.
- p: Purl — the basic purl stitch.
- RS: Right side — the side of the fabric that faces out.
- WS: Wrong side — the inside of the fabric.
- k2tog: Knit two stitches together — a decrease that leans right.
- ssk: Slip, slip, knit — slip two stitches knitwise one at a time, then knit them together through the back loops; a decrease that leans left.
- yo: Yarn over — wrap the yarn over the needle to create an eyelet hole.
- rep: Repeat.
Gauge
24 stitches and 32 rows = 4 inches (10 cm) in stockinette stitch. Knit a small swatch, block it gently, and measure a 4-inch section in the middle; if you have more stitches than 24, go up a needle size, and if you have fewer, go down.
Tips Before You Start
- Count your repeats carefully. The ladder row (Row 5) is worked on the right side every 8 rows, so keep track of which row of the 8-row sequence you're on — a row counter or a simple tally on paper works well.
- Keep the yarn overs loose. The eyelets in the ladder row open up best when you don't tug the yarn over tight; let it sit naturally on the needle.
- Carry your colors up the side. Since you change colors every 8 rows, you can carry the unused color loosely up the edge instead of cutting it each time, which saves weaving in dozens of ends.
- Bind off loosely. The top and bottom edges need to stretch a little when worn, so use a needle one size larger for the bind-off if you tend to bind off tightly.
Step-by-Step Instructions
Body Rectangle (worked flat)
With Color A, CO 108 sts.
Row 1 (RS): k (108 sts).
Row 2 (WS): p (108 sts).
Row 3: k (108 sts).
Row 4: p (108 sts).
Row 5 (RS): *k2tog, yo, k1, yo, ssk, k1; rep from * to end (108 sts).
Row 6: p (108 sts).
Row 7: k (108 sts).
Row 8: p (108 sts).
Change to Color B.
Rows 9–16: repeat Rows 1–8 (108 sts).
Change to Color A.
Rows 17–24: repeat Rows 1–8 (108 sts).
Change to Color B.
Rows 25–32: repeat Rows 1–8 (108 sts).
Change to Color A.
Rows 33–40: repeat Rows 1–8 (108 sts).
Change to Color B.
Rows 41–48: repeat Rows 1–8 (108 sts).
Change to Color A.
Rows 49–56: repeat Rows 1–8 (108 sts).
Change to Color B.
Rows 57–64: repeat Rows 1–8 (108 sts).
Change to Color A.
Rows 65–72: repeat Rows 1–8 (108 sts).
Change to Color B.
Rows 73–80: repeat Rows 1–8 (108 sts).
Change to Color A.
Rows 81–88: repeat Rows 1–8 (108 sts).
Change to Color B.
Rows 89–96: repeat Rows 1–8 (108 sts).
Change to Color A.
Rows 97–104: repeat Rows 1–8 (108 sts).
Change to Color B.
Rows 105–112: repeat Rows 1–8 (108 sts).
Change to Color A.
Rows 113–120: repeat Rows 1–8 (108 sts).
Change to Color B.
Rows 121–128: repeat Rows 1–8 (108 sts).
BO all sts loosely.
Ties (make 2)
With Color A, CO 3 sts.
I-cord: knit 3 sts, then slide the stitches to the other end of the needle without turning, and knit them again. Repeat until the cord measures 12 inches.
BO all sts.
Assembly and Finishing
Fold the rectangle in half with right sides together. Sew the side seams from the bottom edge up 6 inches on each side, leaving the armholes open above. Sew the shoulder seams from the top edge down 2 inches on each side, leaving a neck opening between them. Turn the top right side out. Attach one tie to each front corner at the bottom edge, stitching it securely on the inside. Weave in all ends neatly along the seams. Block gently to the finished measurements (18 inches wide, 16 inches long) by pinning it out and misting lightly, then let it dry completely before wearing.
Pro Tips and Variations
- Make it longer: Add extra 8-row stripe repeats before binding off for a longer tee — just remember to buy extra yarn.
- Swap the palette: Try a soft lilac and cream, or a bold red and navy, to change the whole mood of the top.
- Add a neck edging: Pick up stitches around the neck opening and work two rounds of single-crochet-style or knit ribbing for a tidier finish.