Ochre Acorn Egg Cozy Free Crochet Pattern
Ochre Acorn Egg Cozy – Free Crochet Pattern
Introduction
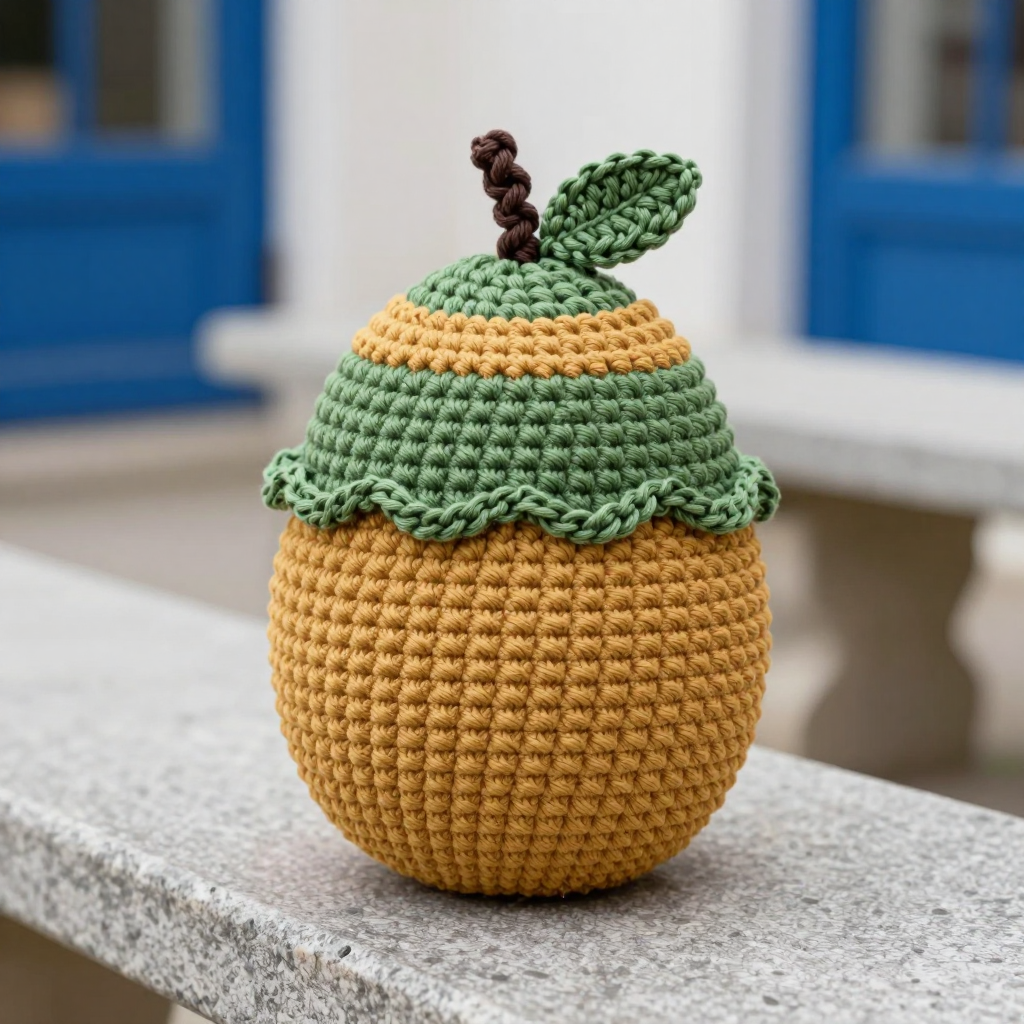
This little ochre acorn egg cozy is the perfect project for anyone who loves cottagecore charm and quick, satisfying makes. It's worked as a simple sphere in single crochet rounds, topped with an olive striped cap, a tiny leaf, and a dark brown stalk. The finished cozy is about 2.5 inches tall and 2 inches wide, fitting a standard egg snugly. It looks like a tiny woodland treasure on your breakfast table and feels soft and sturdy in worsted cotton.
Materials Needed
- Worsted weight cotton yarn, 50g each: ochre (A) 20 yds, olive (B) 10 yds, dark brown (C) 2 yds
- 3.5 mm (E/4) crochet hook
- Stitch marker
- Tapestry needle
- Scissors
- Finished size: approx. 2.5 inches (6.5 cm) tall, 2 inches (5 cm) wide, fits a standard egg
Abbreviations
- MR – magic ring
- sc – single crochet
- inc – increase (2 sc in the same stitch)
- dec – decrease (sc 2 stitches together)
- ch – chain
- hdc – half double crochet
- dc – double crochet
- FO – fasten off
- sts – stitches
- Rnd – round
Gauge
20 sc x 22 rnds = 4 inches (10 cm) in single crochet. To check your gauge, crochet a small swatch in sc and measure a 4-inch section; adjust your hook size if needed.
Tips Before You Start
- Use a stitch marker to mark the first stitch of each round so you don't lose your place.
- Work tightly and evenly so the cozy holds its egg shape.
- Keep your tension consistent when changing colors to avoid gaps.
- Leave long tails on the cap, leaf, and stalk for easy sewing later.
Step-by-Step Instructions
Body (A)
Rnd 1: MR 6 sc (6 sts).
Rnd 2: inc x6 (12 sts).
Rnd 3: [sc, inc] x6 (18 sts).
Rnd 4: [2 sc, inc] x6 (24 sts).
Rnds 5-8: sc in each st around (24 sts).
Rnd 9: [2 sc, dec] x6 (18 sts).
Rnd 10: [sc, dec] x6 (12 sts).
Rnd 11: dec x6 (6 sts).
FO, weave tail.
Cap (B)
Rnd 1: MR 6 sc (6 sts).
Rnd 2: inc x6 (12 sts).
Rnd 3: [sc, inc] x6 (18 sts).
Rnd 4: [2 sc, inc] x6 (24 sts).
Rnds 5-6: sc in each st around (24 sts).
Change to A.
Rnd 7: sc in each st around (24 sts).
Change to B.
Rnd 8: sc in each st around (24 sts).
FO, leave long tail for sewing.
Leaf (B)
Row 1: ch 6, sc in 2nd ch from hook, hdc, dc, hdc, sc (5 sts).
FO, leave tail.
Stalk (C)
Row 1: ch 4, sc in 2nd ch from hook, sc, sc (3 sts).
FO, leave tail.
Assembly and Finishing
Sew the cap to the top of the body, aligning Rnd 1 of the cap with Rnd 1 of the body. Sew the leaf to the top of the cap. Sew the stalk to the top of the cap next to the leaf. Weave in all ends. Block lightly if desired to shape the cozy.
Pro Tips and Variations
- Try a different color for the body, like cream or rust, for a different acorn look.
- Add a tiny embroidered smile or face to the cap for a playful touch.
- Use a smaller hook for a tighter fabric if you want a snugger fit.