Oatmeal Filet Stripe Cami and Pants: Free Crochet Pattern
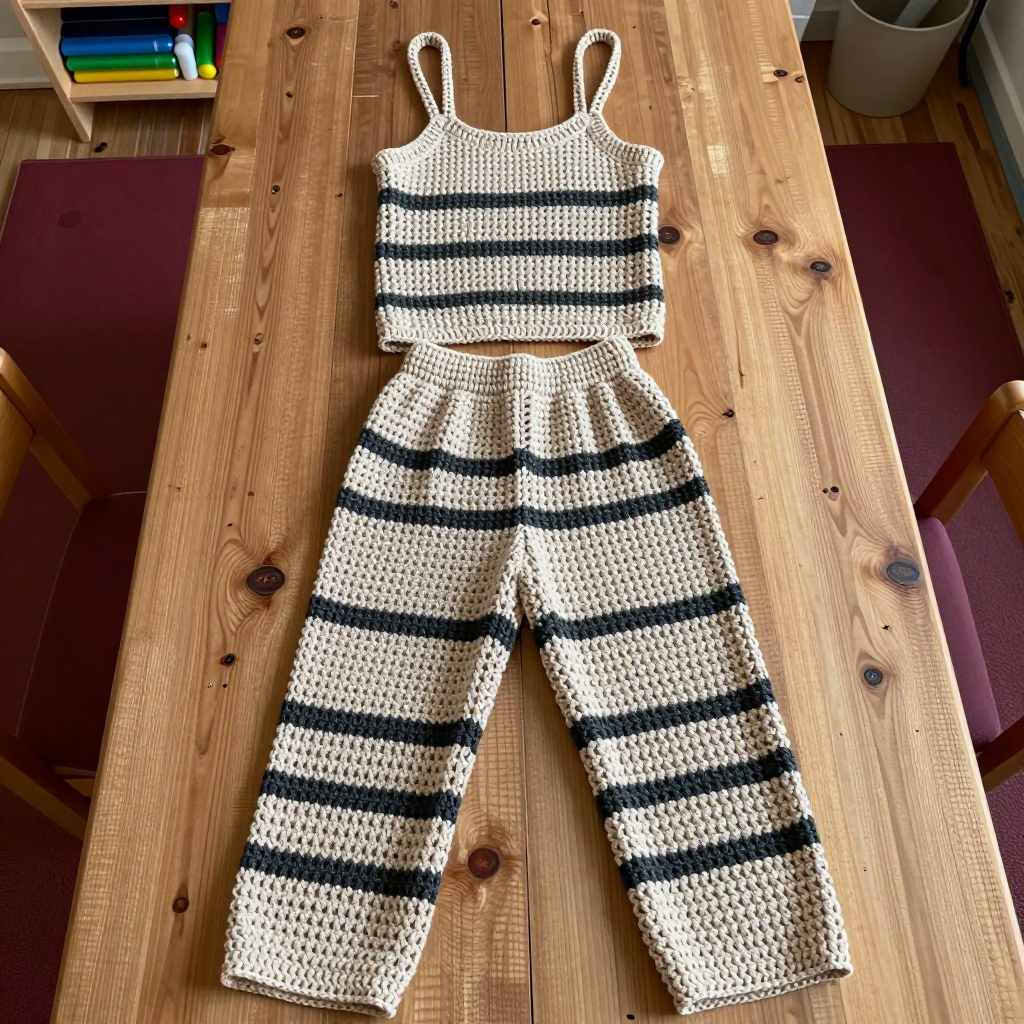
Oatmeal Filet Stripe Cami and Pants: Free Crochet Pattern
Introduction
This relaxed two-piece lounge set is made for anyone who wants something soft enough to sleep in and pretty enough to wear around the house. The camisole is a simple rectangle with thin straps and airy horizontal filet stripes, while the pants are straight tubes with a matching stripe at each ankle. Worked in a worsted-weight alpaca blend, the fabric feels cloud-soft against the skin and drapes beautifully instead of clinging. The open filet mesh keeps the cami light and breathable, and the whole set comes together with basic double and single crochet — perfect for an advanced beginner ready for their first wearable.
Materials Needed
- Yarn: Worsted weight alpaca blend (about 70% alpaca, 30% wool), 800–900 yards total: 500 yards oatmeal (Color A) and 300 yards charcoal (Color B).
- Hook: 5.0 mm (H-8) crochet hook.
- Notions: Yarn needle, stitch markers, tape measure, scissors, 1 inch (2.5 cm) wide elastic — enough to fit your waist (about 28–32 inches).
- Finished size: Cami fits bust 30–34 inches, length 18 inches. Pants fit hips 34–38 inches, inseam 28 inches, waist 28–32 inches (elastic).
Abbreviations
- ch — chain: wrap yarn over hook and pull through the loop.
- dc — double crochet: yarn over, insert hook in stitch, pull up a loop, yarn over and pull through 2 loops twice.
- sc — single crochet: insert hook in stitch, pull up a loop, yarn over and pull through both loops.
- sk — skip: leave the next stitch unworked.
- sp(s) — space(s): the hole made by a chain.
- st(s) — stitch(es).
- sl st — slip stitch: insert hook, yarn over, pull through everything on the hook.
- RS — right side: the side of the fabric that faces out.
- rep — repeat.
- rnd(s) — round(s): a row worked in a continuous circle.
Gauge
16 stitches x 8 rows = 4 inches in filet pattern (dc, ch 1, sk 1) after blocking. Work a small swatch, block it, and measure across the middle — if you have more stitches than 16, go up a hook size; if fewer, go down.
Tips Before You Start
- Count your chains carefully. The cami starts with ch 81, which gives 40 dc and 39 ch 1 spaces. Recount before Row 1 — every later row depends on it.
- Keep your ch 1 spaces even. In filet, the holes should look like a tidy grid. If they stretch or close up, check that you are chaining 1 and skipping exactly 1 stitch each time.
- Carry or cut your colors? Because the stripe bands are short, fasten off Color B after each pair of rows and rejoin Color A — it keeps the edges clean and the stripes crisp.
- Try the pants on as you go. The legs are straight tubes with no shaping, so check the circumference against your hips after Round 4 before you commit to 34 more rounds.
Step-by-Step Instructions
Cami (worked flat)
With A, ch 81 (multiple of 2 + 1).
Row 1 (RS): Dc in 4th ch from hook, *ch 1, sk 1, dc in next ch; rep from * to end, turn. (40 dc, 39 ch 1 sps)
Row 2: Ch 3 (counts as dc), *ch 1, sk 1, dc in next dc; rep from * to end, turn. (40 dc, 39 ch 1 sps)
Rows 3–4: Rep Row 2. (40 dc, 39 ch 1 sps)
Change to B.
Rows 5–6: Rep Row 2. (40 dc, 39 ch 1 sps)
Change to A.
Rows 7–12: Rep Row 2. (40 dc, 39 ch 1 sps)
Change to B.
Rows 13–14: Rep Row 2. (40 dc, 39 ch 1 sps)
Change to A.
Rows 15–26: Rep Row 2. (40 dc, 39 ch 1 sps)
Change to B.
Rows 27–28: Rep Row 2. (40 dc, 39 ch 1 sps)
Change to A.
Rows 29–34: Rep Row 2. (40 dc, 39 ch 1 sps)
Change to B.
Rows 35–36: Rep Row 2. (40 dc, 39 ch 1 sps)
Change to A.
Rows 37–40: Rep Row 2. (40 dc, 39 ch 1 sps)
Fasten off.
Straps (make 2)
With A, ch 40. Row 1: Sc in each ch across. (40 sc) Fasten off, leaving a long tail. Make a second strap the same way.
Pin one strap end to the top front corner and the other end to the corresponding back position, about 12 inches apart when worn. Repeat with the second strap on the other side.
Cami Edging
With A, join yarn at one top corner. Rnd 1: Sc evenly around the entire top edge, down one armhole, across the bottom edge, and up the other armhole, working 1 sc in each dc and 1 sc in each ch 1 sp along the edges; join with sl st to first sc. Fasten off.
Pants — Leg (make 2)
With A, ch 61, join with sl st to form a ring, being careful not to twist.
Rnd 1: Ch 3, dc in each ch around, join with sl st to top of ch 3. (60 dc)
Rnds 2–4: Ch 3, dc in each dc around, join. (60 dc)
Change to B.
Rnd 5: Ch 3, *ch 1, sk 1, dc in next dc; rep from * around, join. (30 dc, 30 ch 1 sps)
Rnd 6: Ch 3, *ch 1, sk 1, dc in next dc; rep from * around, join. (30 dc, 30 ch 1 sps)
Change to A.
Rnds 7–40: Ch 3, dc in each dc around, join. (60 dc)
Fasten off. Make the second leg the same way.
Joining the Legs at the Crotch
Turn both legs inside out and align the inner leg seams so the legs sit side by side. With A, join yarn at the inner leg seam and sc across the front and back gap to close it, working through both layers; or sew the gap closed with a yarn needle. Fasten off.
Waistband
With A, join yarn at the waist edge. Rnd 1: Sc evenly around, join. Rnd 2: Sc in each sc around, join. (Work 1 sc per stitch around the waist.) Fasten off, leaving a long tail. Fold the waistband to the inside and sew it down, leaving a 2-inch opening. Insert the elastic, overlap the ends and stitch them securely, then sew the opening closed.
Ankle Edging
With A, join yarn at one ankle opening. Rnd 1: Sc evenly around the opening, join. Fasten off. Repeat around the second ankle.
Assembly and Finishing
Sew the straps firmly to the front and back of the cami with the yarn needle, using the long tails and going over each join twice for strength. Weave in all ends on the wrong side, working them through a few stitches in two directions so they stay put. Block the cami and pants to the finished measurements — mist lightly, pin to size, and let dry flat. Blocking opens up the filet mesh and softens the alpaca blend so the set drapes the way it should.
Pro Tips and Variations
- Make it longer: Add extra oatmeal rows in the longest A section (Rows 15–26) for a tunic-length cami — just add the same number of rows to both the front and back if you work them separately.
- Change the stripe: Swap charcoal for dusty rose, sage, or cream for a softer palette, or widen the B bands to 4 rows for bolder stripes.
- Add drawstring ties: Thread a crocheted chain of A through the waistband casing instead of elastic for an adjustable, boho finish.


