Bunny Ears Mini Basket Free Crochet Pattern
Bunny Ears Mini Basket Free Crochet Pattern
Introduction
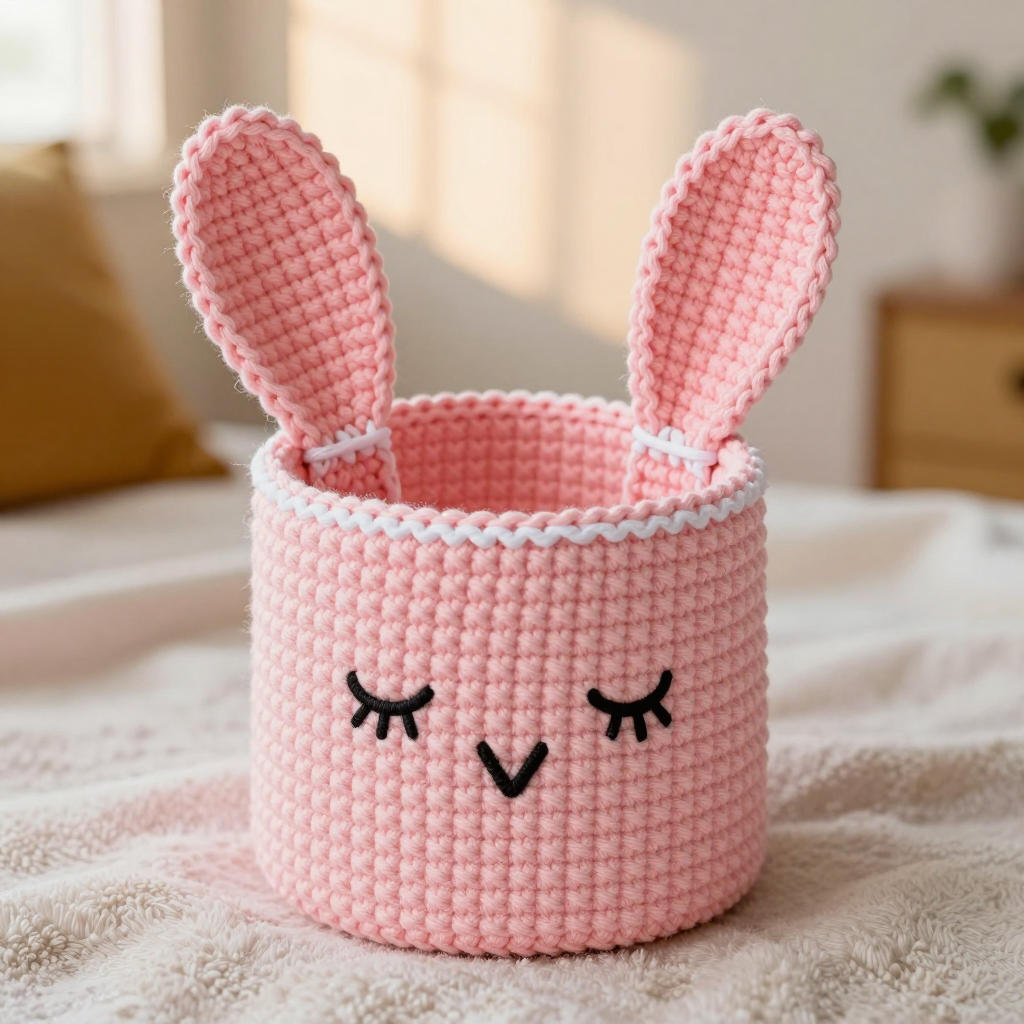
This little bunny basket is the perfect quick win for anyone who has just learned single crochet and wants a finished project that actually looks adorable on a desk or nursery shelf. It is a simple straight-sided tube worked from a flat circle, so there is no shaping to fear, and the two long rounded ears are made separately and stitched on at the end. The pale pink cotton gives it a soft, matte, slightly structured feel that holds its shape while staying cuddly, and the white slip-stitch rim plus a tiny sleepy embroidered face make it instantly kawaii. Fill it with paper clips, hair ties, or tiny toys, and it doubles as a sweet handmade gift.
Materials Needed
- Yarn: Worsted weight (CYC 4), 100% cotton, approx. 60 yd / 55 m total: Pale Pink (A) 50 yd, White (B) 8 yd, Black (C) 2 yd
- Hook: 4.0 mm (US G-6)
- Notions: Tapestry needle, stitch marker, scissors, pins for assembly
- Finished size: Approx. 3.5 in / 9 cm diameter x 3.25 in / 8 cm tall; ears add 2.5 in / 6.5 cm above the rim
Abbreviations
- ch – chain: make a loop of yarn and pull it through the loop on your hook.
- sc – single crochet: insert hook, yarn over, pull up a loop, yarn over, pull through both loops.
- inc – increase: work 2 single crochet into the same stitch.
- dec – decrease: single crochet 2 stitches together into one.
- sl st – slip stitch: insert hook, yarn over, pull through both the stitch and the loop on your hook.
- MR – magic ring: an adjustable loop used to start a circle with no hole.
- BLO – back loops only: work into the loop of the stitch farthest from you.
- sts – stitches
- rnd(s) – round(s)
Gauge
16 sc x 18 rnds = 4 in / 10 cm in single crochet worked in the round. Work a small swatch in the round and measure the middle of it; if you have more stitches than 16 in 4 in, go up a hook size, and if you have fewer, go down.
Tips Before You Start
- Use a stitch marker in the first stitch of each round; the base is worked in a continuous spiral, so the rounds will drift slightly without one.
- Keep your tension even and fairly firm so the basket stands up on its own; cotton is ideal because it holds shape better than acrylic.
- Round 9 is worked in the back loops only, which creates a crisp ridge where the base meets the sides — make sure you are working into the back loop and not the whole stitch.
- Leave the ears unstuffed and flatten them before pinning; a flat ear sits neatly against the rim and stays upright.
Step-by-Step Instructions
Base (Color A)
Rnd 1: MR, 6 sc into the ring (6 sts).
Rnd 2: inc x6 (12 sts).
Rnd 3: [sc, inc] x6 (18 sts).
Rnd 4: [2 sc, inc] x6 (24 sts).
Rnd 5: [3 sc, inc] x6 (30 sts).
Rnd 6: [4 sc, inc] x6 (36 sts).
Rnd 7: [5 sc, inc] x6 (42 sts).
Rnd 8: [6 sc, inc] x6 (48 sts).
Do not fasten off.
Sides (Color A)
Rnd 9: Working in back loops only, sc around (48 sts).
Rnds 10–24: sc around (48 sts) — 15 rounds straight, for 16 straight rounds total including Rnd 9.
Rnd 25: sl st around (48 sts).
Fasten off and weave in ends.
Ear (make 2, Color A)
Rnd 1: ch 2, 3 sc in 2nd ch from hook (3 sts).
Rnd 2: inc x3 (6 sts).
Rnd 3: [sc, inc] x3 (9 sts).
Rnds 4–14: sc around (9 sts) — 11 rounds.
Rnd 15: [sc, dec] x3 (6 sts).
Rnd 16: dec x3 (3 sts).
Fasten off leaving an 8 in / 20 cm tail. Do not stuff.
Face (Color C)
With C, embroider two closed sleepy eyes as 3-stitch straight stitches each, 1 round below the rim, spaced 6 sts apart, slanting slightly down at the outer ends. With C, embroider a small V nose 2 sts below the eye line at center. With C, embroider 3 short straight stitches under the nose for the mouth.
Assembly
Flatten each ear. Pin the ear bases to the inside of the rim at front-left and front-right, 8 sts apart, 1 in / 2.5 cm from the side seam, pointing up. Whipstitch the base of each ear to the rim through both layers with A. Weave in all ends.
Edging (Color B)
With B, sl st around the top rim (48 sts), working over the ear join stitches. Fasten off and weave in ends.
Assembly and Finishing
If you have not already joined the ears, pin them in place first and check the spacing from the front before stitching, since the face should sit centered between them. Whipstitch each ear base firmly through both layers of the rim with Color A, catching the edging round as you go so the join disappears. Weave in all ends on the inside of the basket, running each tail through a few stitches before trimming. Block lightly by misting with water and shaping the basket over a small cup or jar so the sides stand straight and the rim stays round; let it dry completely before removing. Gently steam the ears flat if they curl.
Pro Tips and Variations
- Swap the pale pink for any worsted cotton color and change the ear and edging contrast to match a nursery or desk theme.
- Add a second slip-stitch round in Color B for a thicker, more defined rim, or work the edging in Color A for a subtler look.
- Make a taller version by adding extra straight sc rounds before the final slip-stitch round; each extra round adds about 0.2 in / 0.5 cm of height.